I mentioned a day or two ago a couple blog entries about hand coding vs. WYSIWYG. Roger’s entry generated quite a discussion, including some Dreamweaver bashing. Jonathan Snook took issue with that in those comments (see especally comments 41 and 49), and he followed that up by posting a great little tutorial on Dreamweaver’s Search and Replace functionality over on his own blog.
Jonathan inspired me a little bit, and I thought I would follow his lead and do a little bit about MY favorite thing about Dreamweaver: integrated FTP. I am hoping Jonathan follows up on his Search and Replace tutorial with some stuff about his other favorite features, and I certainly plan to do the same over here.
In every other editor I have used, FTP support ranges from nonexistent to not-very-easy-to-use. FTP in Dreamweaver is beautiful; you take a couple preliminary steps up front, and then it is really as easy as hitting a couple keys. Here are the steps:
- Setting up your site.
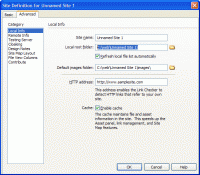
When creating a new site in Dreamweaver’s “Site Manager,” there are two steps to set up proper FTP access. First, you go into the “Local Info” section:

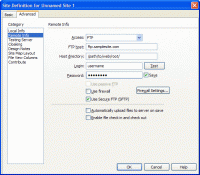
The key here is the “Local Root Folder” section. You simply set that to the directory on your local machine that holds your site files. Keep in mind that this directory will correspond directly to the “Host Directory” we will set up in the next part of step 1. Speaking of the next part of step 1…The next part of step 1 is setting up the “Remote Info” section in your “Site Manager”:

Here, you select “FTP” in the drop-down “Access” menu, which brings up all the fields for setting up your FTP server. The “Host directory” field is where you enter the path to your web root; this is where all files you upload will be put.(A minor note about the box you see checked in the screenshot above, “Use Secure FTP (SFTP)”: this feature is MUCH better in Dreamweaver MX 2004 than it was in Dreamweaver MX. Both versions use PuTTY to handle the SSH side of things, but 2004’s version is much more seamlessly integrated. This was very important to me, as several of the sites I work on every day at work require SFTP.)
Anyway, once you have set up your FTP server information, you can save your site. And guess what? All the preliminary steps are out of the way! The rest is easy as pie, or something.
- Uploading Files
There are three ways to upload a file or several files: the main menu, the right-click context menu, and keyboard shortcuts. Let’s say you are working on a script, and you get to a point where you are ready to upload it. All you do is go up to the Site menu at the top of your Dreamweaver window, and select “Put”:

This uploads the file to your server, maintaining the directory relationship and structure present on your local machine. For example, let’s say your “Local root folder” in your Site Manager is set to C:, your remote “Host directory” is set to “/webroot/,” and the file you are working on is located at C:\dir1\dir2\dir3\file.php. Well, when you upload the file, no matter which method you use, it will get uploaded to /webroot/dir1/dir2/dir3/file.php. Most of the other editors I have used, if they bother to have FTP support at all, require to specify exactly where you want each file saved.As you can see from the screenshot above, the keyboard shortcut to the “Put” command is Ctrl+Shift+U. It works exactly the same as the last paragraph, it’s just a little quicker. I think I probably hit Ctrl+Shift+U about a hundred times a day, and I don’t know what I would do without it.
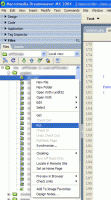
The third way to upload a file or several files is using the right-click context menu. The advantage of this method is that you can upload several files at once. You can right-click on a directory in your Files list, or on a specific file, or select several files and then right-click. Whatever you decide to right-click on, you simply select the “Put” option once again:

Again, it’s about as easy as can be.There you have it. That is why I love Dreamweaver, and that is why I keep coming back to her after all these years. I have tried other editors, and none of them compare in this aspect.
If you see anything I have missed, please post it in the comments, and I will do any necessary updates. Also, if there is something about Dreamweaver that you absolutely love, either let me know or write up a tutorial on your own blog, and let us have the link.